If perchance one aims to embed presets on their Lightroom mobile (an application on Android and ios), this is the suitable source. We will delve deeper into the subject matter by imparting thorough comprehension regarding the most efficient means to implant Lr presets on Lightroom mobile.
| Install presets in lightroom mobile (Android) | XMP File Guide |
| Install presets in lightroom mobile (Apple) | DNG File Guide |
Install presets in lightroom mobile Android
There exist three methods to integrate lightroom presets in the lightroom android application.
- Primarily, one may employ the “import presets” function.
- Secondarily, utilizing the DNG file is an alternative.
- Lastly, manually traversing the Lightroom folder in the android data and importing is a possibility.
Nonetheless, we shall only elaborate on one method, which is most fitting, uncomplicated, and comprehensible for the majority. In contrast to mobile, incorporating presets in lightroom desktop is a relatively effortless undertaking.
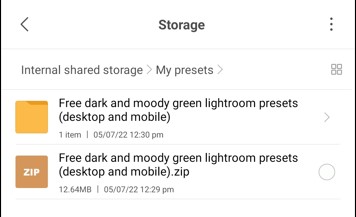
#Step 1. Download Lightroom Presets > extract on specific Folder
The initial step necessitates the acquisition of free lightroom presets from our website, where an extensive collection of distinct color presets are obtainable, without incurring any expense.
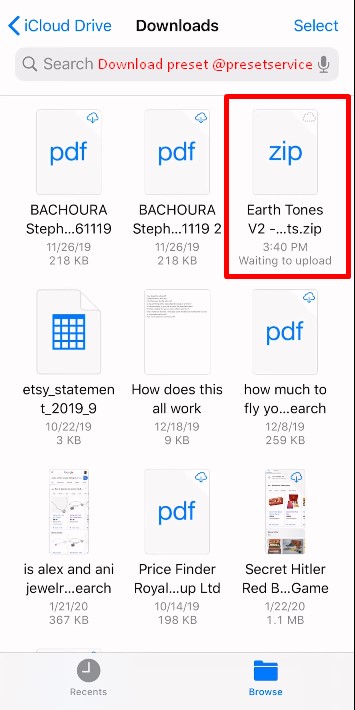
The .Zip file ought to be downloaded, followed by the customary extraction of the file at a designated location. This practice enables us to remember the folder upon importation of lightroom presets.
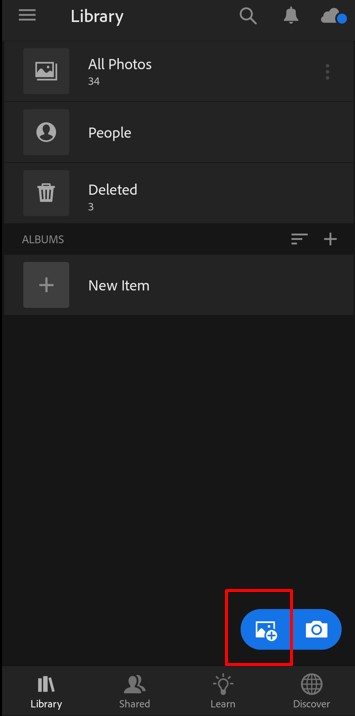
#step 2. Open lightroom application > (Add on “+” icon) > Tap on ADD button
The subsequent step entails launching the lightroom application. If the application is not yet acquired, it can be downloaded from the playstore.
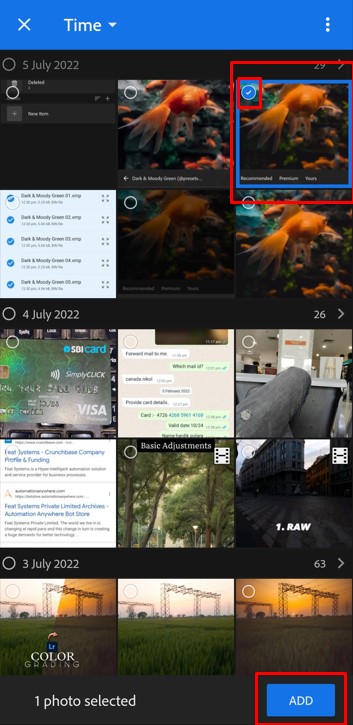
Upon successfully installing the lightroom application, the initial prerequisite is to import preferred images onto the lightroom application. To achieve this, one must select the ” +” icon displayed on the image. The following step involves handpicking specific images to import onto the lightroom application.
#Step 3. Click on Presets icon > Click on 3 dots > select (import presets)
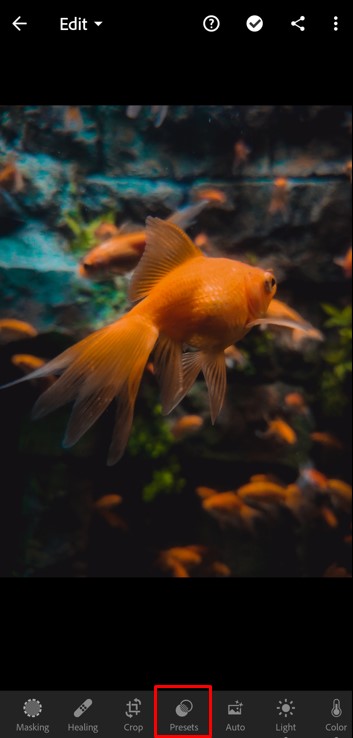
Upon efficiently implementing all the breathtaking photographs, one must click on the preset icon situated at the bottom of the scroller navigation.
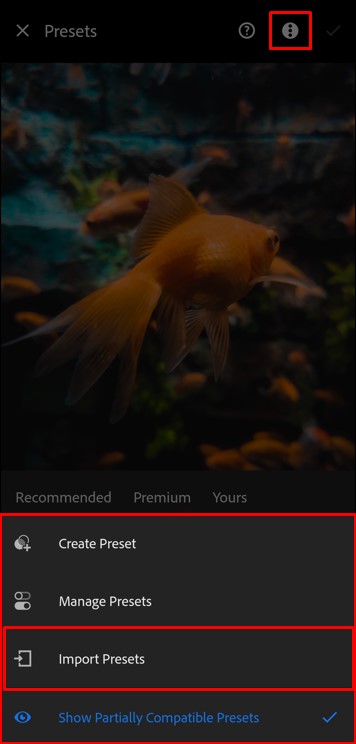
The subsequent stage entails clicking on the three dots located at the top of the lightroom application. Once clicked, an import presets function will be visible. Without hesitation, one must click on it.
#step 4. Navigate specific folder > Select All presets > import Presets
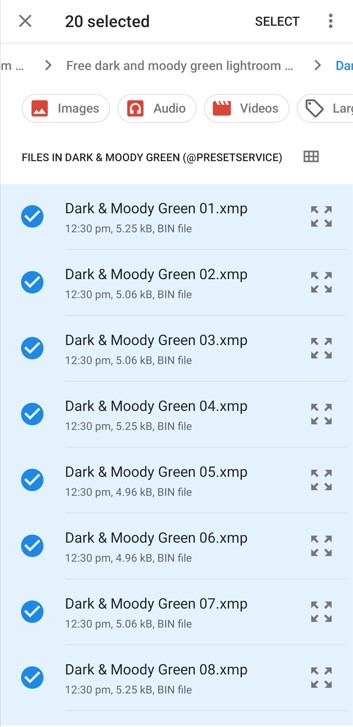
The next step involves selecting the presets folder where the premium lightroom presets were previously extracted. One must then select all the presets that require importing and click on the “Select or add” button.
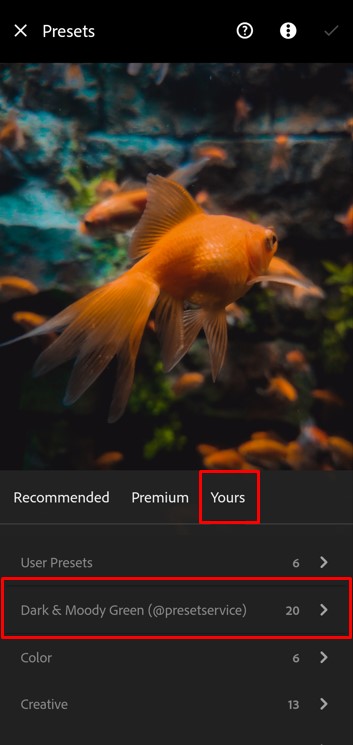
After importing, all the presets can be viewed in the “yours” section of the presets segments.
#step 5. Click on Presets bundle > see the magic
Now, it’s time to use the presets. Simply click on the individual presets one by one and watch the magic happen behind the readymade presets.
After clicking on the presets, one can either make slight changes to individual settings to create a perfect image or keep the existing settings as they are.
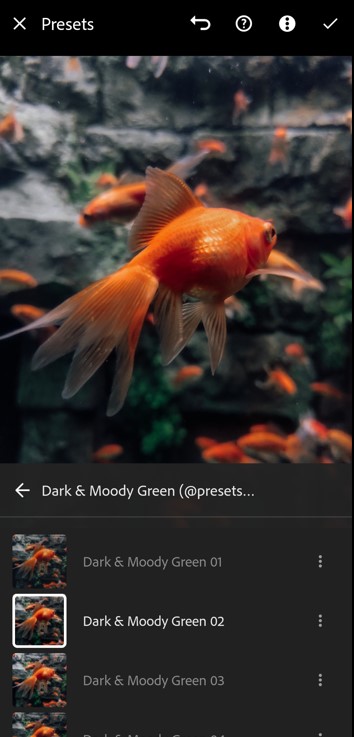
We hope that this guide has provided you with clear instructions on how to install presets in Lightroom Mobile (Android). With the latest update, the process has become very easy and user-friendly, unlike the previous method of installing XMP files, which was time-consuming and complicated.
Whether you are a technical or non-technical person, you should have no trouble following these steps and enhancing your photos with the help of ready-made presets.
Learn how to effortlessly install Lightroom presets on both Android and iOS devices. Customize your photo editing experience and achieve stunning results with our step-by-step guide to installing Lightroom presets.
Install presets in lightroom mobile iOS
Installing presets in Lightroom mobile on an iOS device is slightly more complicated than on an Android device. It takes a bit more time, but once you’ve done it, importing Lightroom presets on your iPhone will no longer feel complicated.
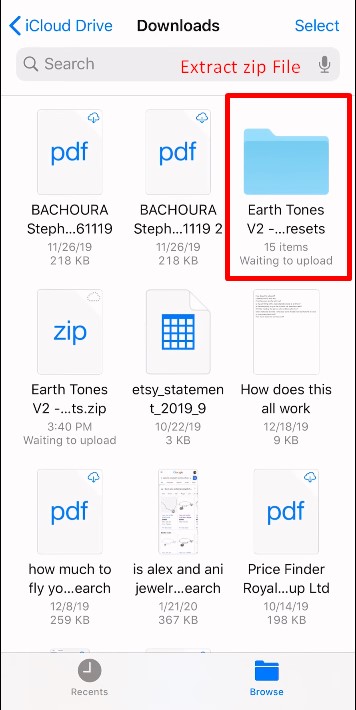
#step 1. Download lightroom presets > extract on certain folder
To start with, the first step is to download the Free lightroom presets. Once you have downloaded the presets, extract the folders and save them in a specific folder so that it’s easy to find when you import them into Lightroom.
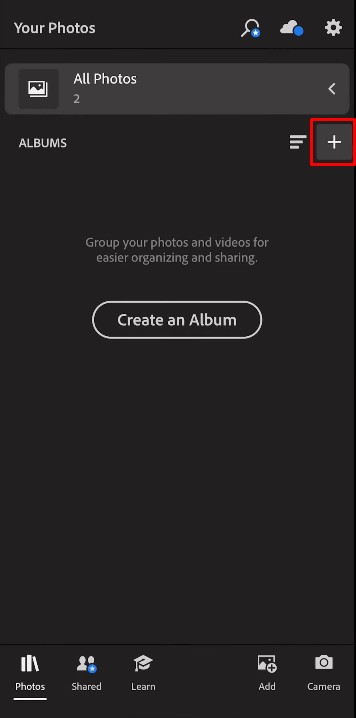
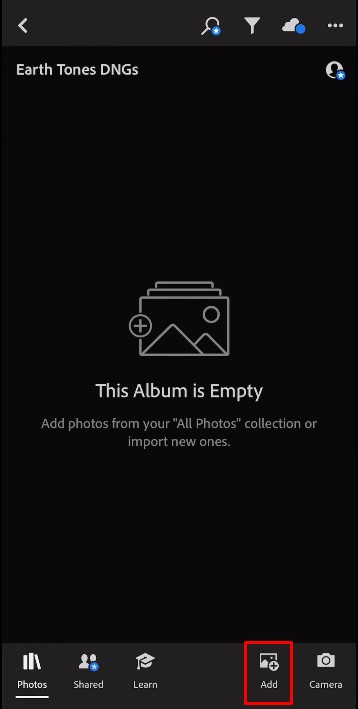
#step 2. Download lightroom Application > Click on “+” icon > Create folder
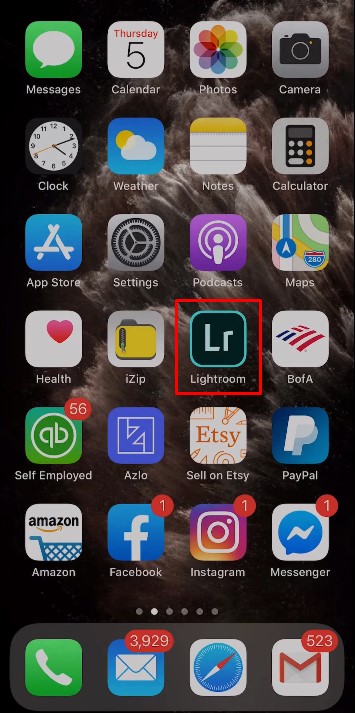
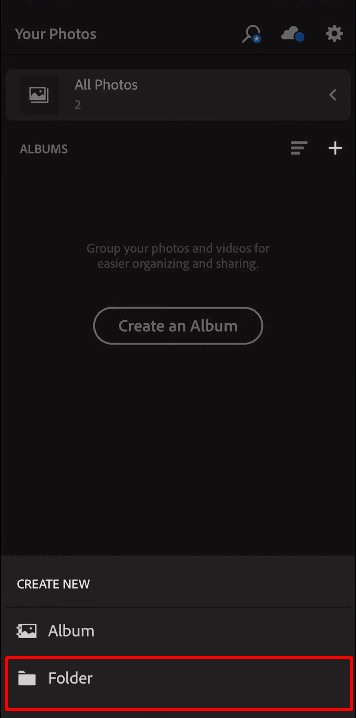
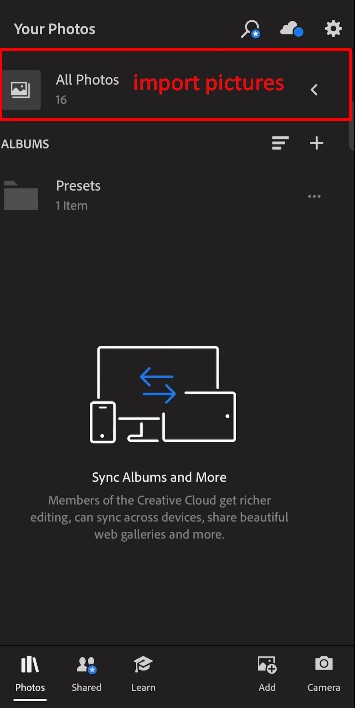
To install presets in Lightroom mobile on an iPhone, first download the Lightroom app from the App Store and open it. Once you have opened the application, click on the “+” icon and select the folder option from the menu.
#step 3. Give the Folder name > Create Album > click on ADD
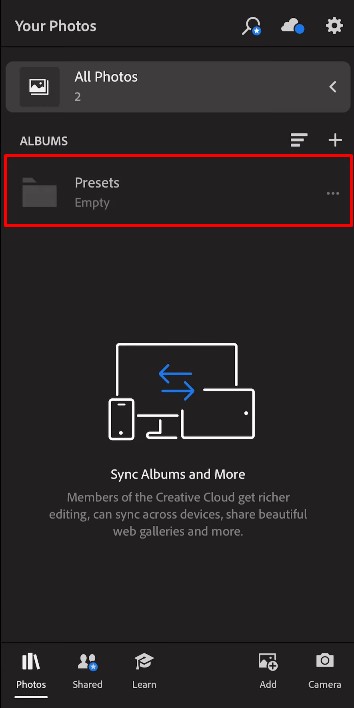
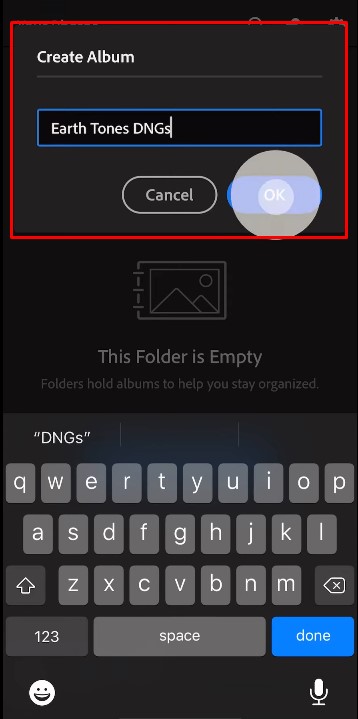
After giving a specific name to the folder, we need to create a new album within that folder. For example, we can name the new album “Earth Tones DNGS”. This will help us to keep our presets organized and easily accessible.
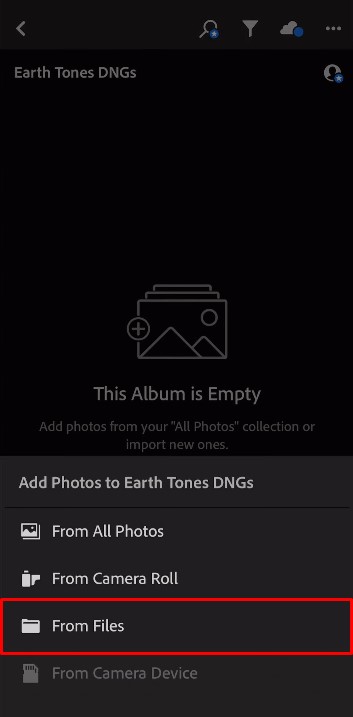
#step4. Select From File > Select All DNG file > Click Select Option
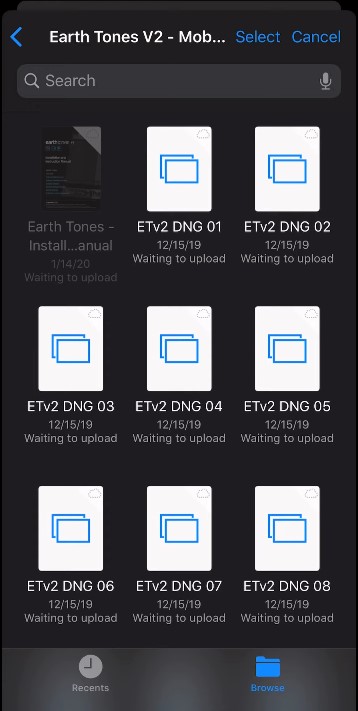
To import DNG files into Lightroom on iOS devices, you can select the “From Files” option after clicking on the “+” icon. This option allows you to navigate to the folder where you have downloaded the DNG presets.
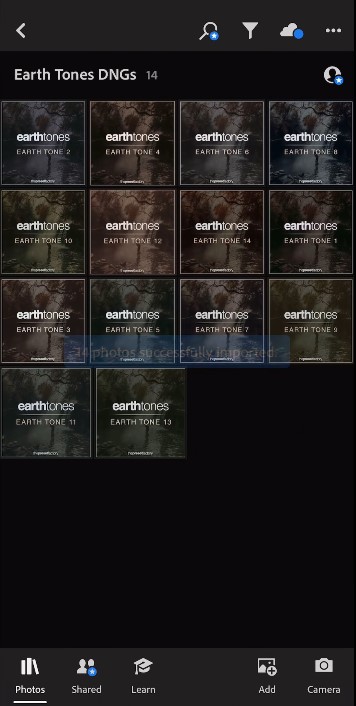
Once you have selected all the DNG File, you can click on the “Select” button to add them to your Lightroom application or folder.
#step 5. Click on DNG file & click 3 dots > choose create preset option > create custom presets
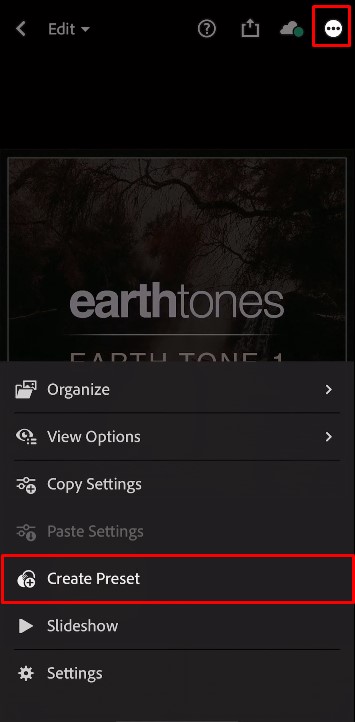
The next step is crucial, where we need to click on the DNG file. After opening the picture, click on the three dots located at the top section of the Lightroom iOS application. Then, choose the “Create Preset” option.
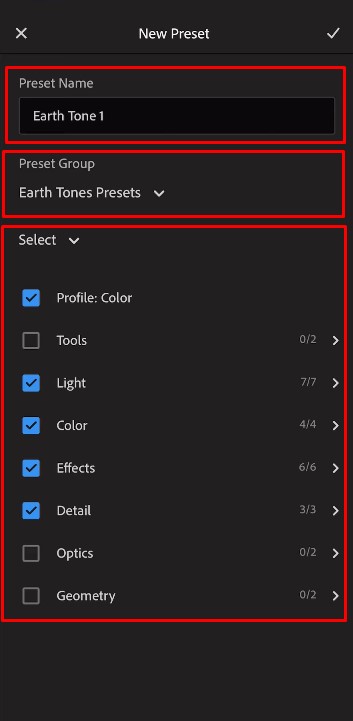
When given the opportunity to generate customized presets, it is important to choose a distinct name that can easily be recalled for future access.
Furthermore, it is crucial to select a specific group that aligns with the type of presets you are creating, especially if you have multiple groups such as those for creating dark and moody, travel, ocean, and skin tone presets.
Once you have selected the appropriate group, proceed by selecting the desired setting. However, if you are not familiar with a particular setting, it is recommended to avoid modifying it. Finally, click on the appropriate icon to successfully create your customized presets.
#step 6. Import amazing pictures > Click on presets > Apply presets on images
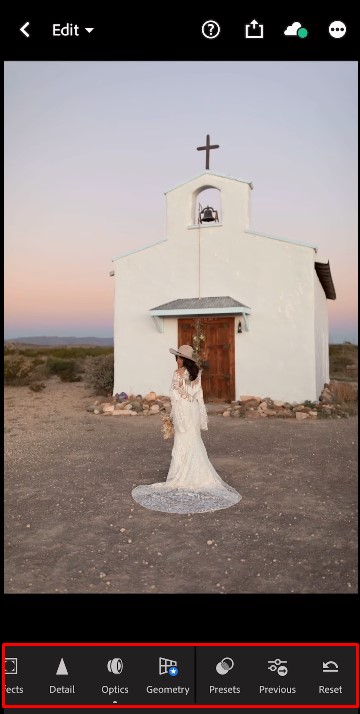
To utilize your personalized presets, begin by importing your stunning photographs that require editing. Once the image has been opened, navigate to the lower section where the presets icon can be found, as depicted in the second image.
Afterward, proceed by applying your preferred presets to a variety of different images and indulge in the enchanting process offered by our complimentary Lightroom presets.
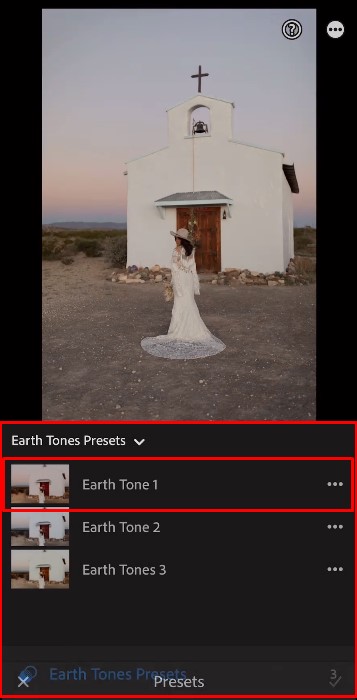
We trust that you have effectively loaded our Adobe Lightroom presets onto your iPhone device. The process is quite straightforward and once accomplished, it will be a breeze to use the presets for your Instagram and Facebook images, especially after investing time in creating the perfect preset for your needs.
According to research conducted by various social media platforms, over 70% of influencers utilize Lightroom presets to efficiently edit their pictures. This approach saves time and consistently delivers precise results every time.
FAQs
You should follow 4 steps that are mentioned in this articles and get appropriate knowledge about install lightroom presets on android device
You should follow 6 steps that are included in the articles and you will get desire information of How to Install Lightroom Presets in Iphone
Conclusion
By mastering a few fundamental steps, you can acquire essential skills that will enable you to edit professional-quality images with ease. Once you have learned how to add presets in Lightroom Mobile, you can conveniently transform your photos into stunning works of art. Our basic guide to installing presets in Lightroom Mobile will undoubtedly aid you in realizing your aspirations of becoming a proficient image editor.

