Importing premium Lightroom presets into your Lightroom PC is a breeze for both Windows and Mac users. Simply follow the basic steps outlined below, and in just under 200 seconds, you’ll have all your presets ready to go. The process is straightforward, and you’ll be up and running with your favorite Lightroom presets in no time!
| Install presets in lightroom Desktop (Windows) | XMP File Guide |
| Install presets in lightroom Desktop (Mac) | XMP File Guide |
How to install presets in Lightroom windows
To install presets in Lightroom on Windows, you only need to follow five simple steps.
Firstly, make sure you have the Lightroom Classic and CC version installed. If you’re new to the software, it’s recommended to follow all five steps. However, if you’re familiar with the process, you can skip to #step 3 which is specifically mention how to add lightroom presets.
#step 1: open lightroom desktop application > library > click on import
Once you download lightroom desktop application, you need to open lightroom application.
Next, select the “Library” tab or wait for it to load by default. Then, click on the “Import” button and wait for the next tab to appear.
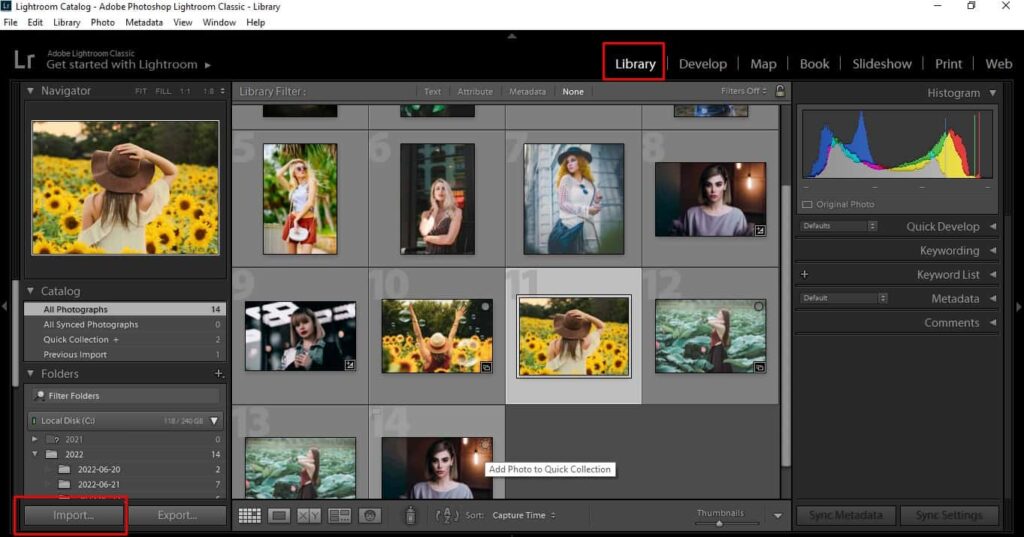
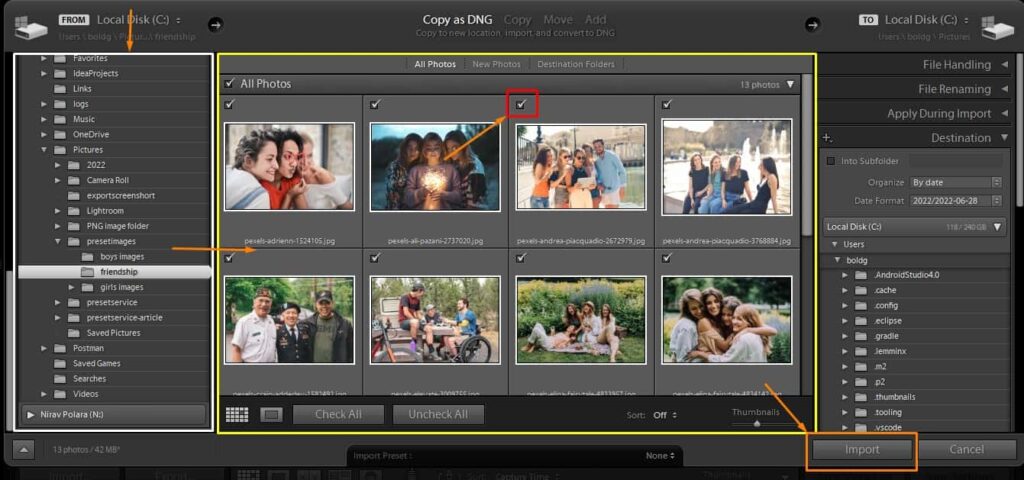
#step 2: select folder > select favorite images > click on import
Take a careful look at the interface and navigate to the folder where you have saved the various types of pictures. Click on the checkmark icon on the right-hand side to select the folder.
Finally, click on the “Import” button and Lightroom will automatically load your selected images into your gallery.
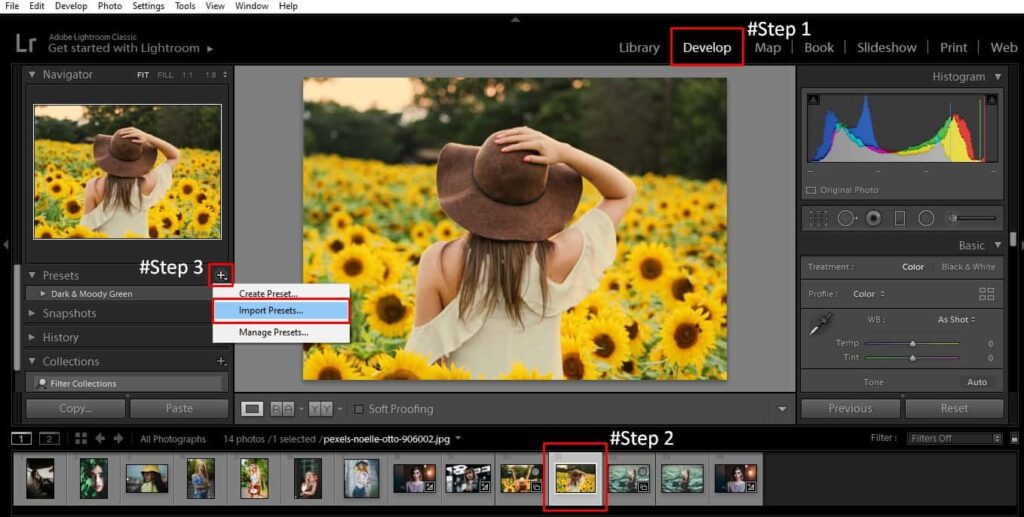
#step 3: Select Develop section > choose images > “+” icon > choose import presets button
Once all the images have been imported, go to the “Develop” section. From there, select a particular picture that is suitable for your presets.
Next, click on the “+” icon, which will bring up a popup menu. From there, select the “Import Presets” function.
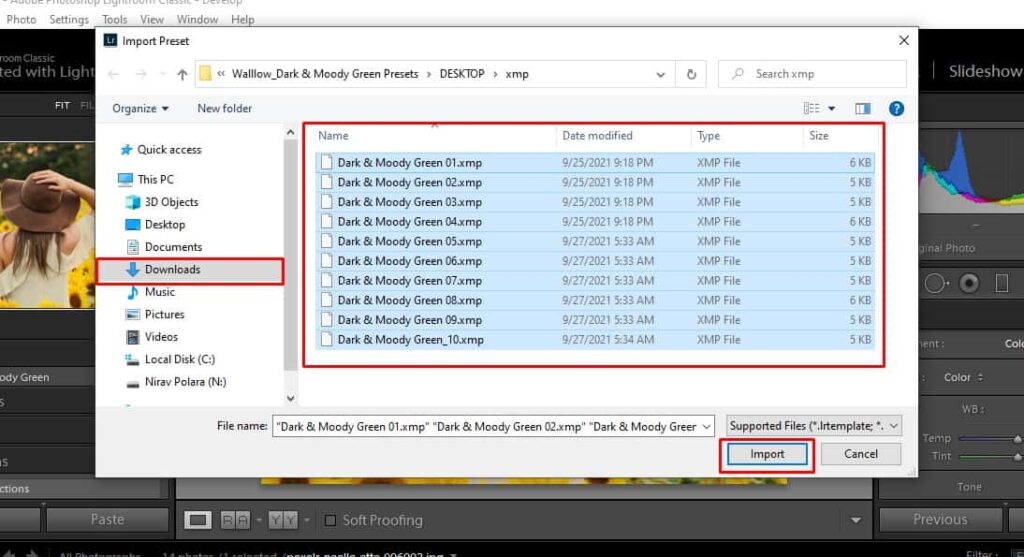
#step 4: navigate presets folder > Select all presets > click on import button
Once the import presets folder is open, navigate to the specific folder where you downloaded the Lightroom presets from the PresetService website.
After locating the folder with the Lightroom presets, either click on the “Select” button or manually select specific presets. Once you have made your selection, click on the “Import” button and the system will automatically add all the selected presets to your machine.
#step 5: move cursor on favorite presets > see changes > click on final presets > magic happen
After successfully importing all the selective presets to your device, move the cursor over each individual preset. If you realize that a certain preset works well for your image, click on that preset to apply it.
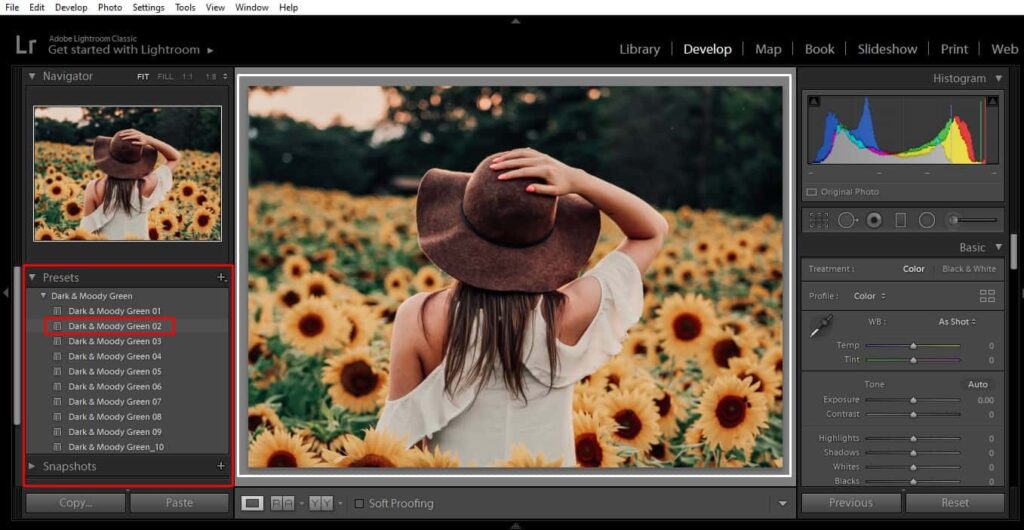
If you’re not satisfied with the color, contrast, exposure, luminance, vibrance, or overall settings of the preset, you can make your own changes in the right side of the Lightroom application segment.
How to Install Lightroom Presets on Mac
The process of installing Lightroom presets on a Mac is almost identical to the process on the Lightroom desktop.
#step 1. Open Lightroom > import pictures > click on “+” icon > Click on import presets
Importing Lightroom presets on a Mac is a simple process. First, import your favorite images, and then you will see the Lightroom interface. On the right or left side of the interface, you will see the “Presets” section, where you can find the “+” icon.
Once you click on the “+” icon, a small popup will appear. From there, click on the “Import Presets” option.
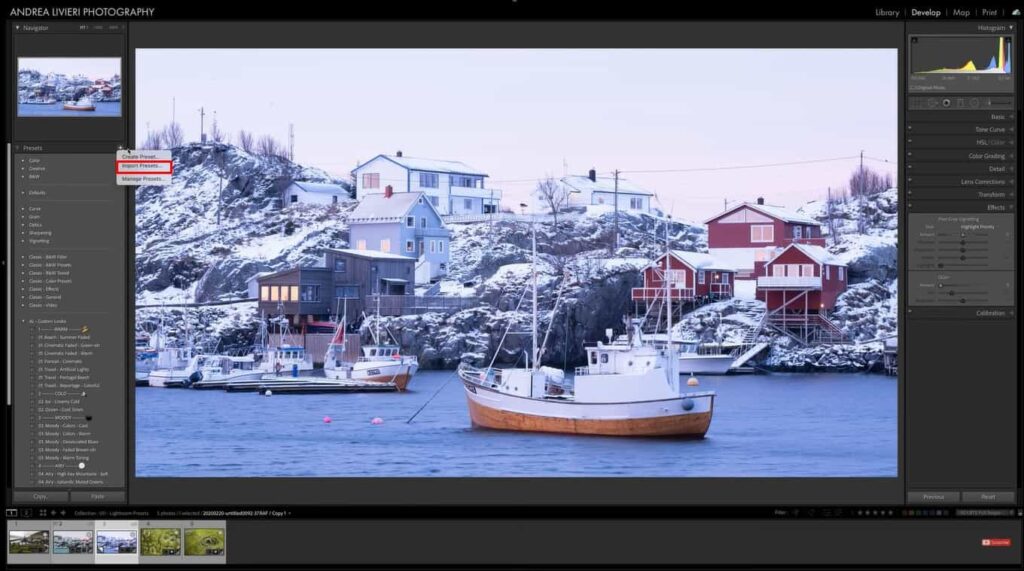
#step 2. Navigate specific folder > select all presets > click on the import button
After opening all the file sections, navigate to the folder where you downloaded all the presets. Once you’re there, you can either select all the presets or select the entire folder. Then, simply click on the “Import” button.
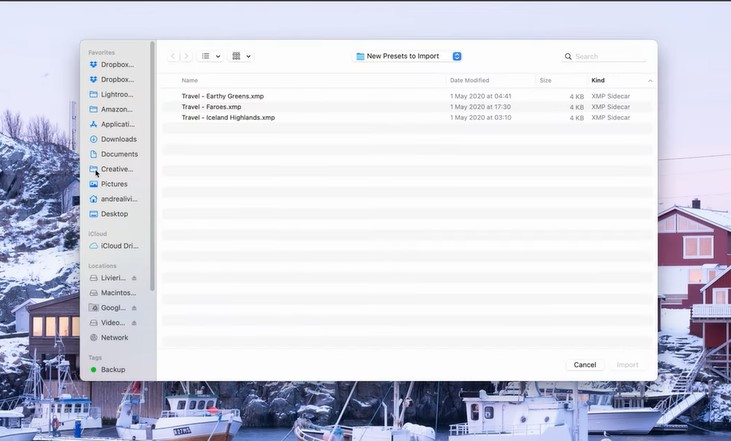
#step 3. See Presets section > click on presets > magic happen
The Lightroom application will automatically import all the presets. You can check the “Presets” section to see all the imported presets. Now it’s time to use them. Simply click on the individual presets to see the magic happen.
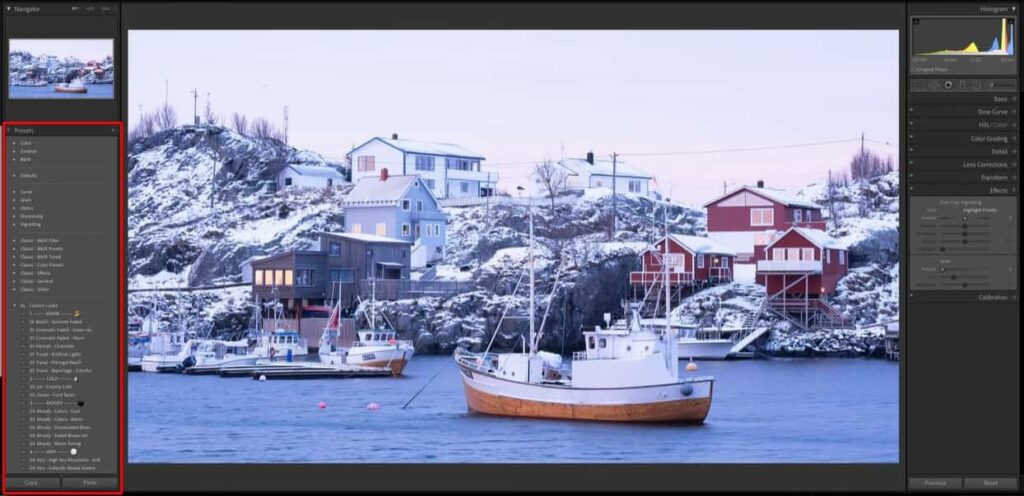
Delving into the world of Lightroom presets on PC can be a daunting task, but fear not, for our comprehensive guide on adding these magical tools to your arsenal is here to illuminate the way. Not only that, but we’ll also explore the intriguing realm of installing presets on Lightroom mobile.
Whether you’re an experienced shutterbug or a budding photographer, utilizing presets can prove to be a game-changer in your quest for picture-perfect shots. The process of achieving professional-level photographs can be a Herculean feat, especially for those new to the craft.
However, with the aid of Lightroom presets, you can swiftly and effortlessly obtain stunning results in mere seconds. The possibilities are endless, so why not take advantage of this powerful tool?
Additional Tips for Installing Lightroom Presets
To streamline your workflow and avoid the headache of endless searching, it’s crucial to arrange your presets into neat and tidy folders for effortless retrieval. Keep in mind that some presets may arrive in ZIP format, necessitating extraction before transferring them to your designated preset folder.
For those who like to add a personal touch to their creations, you can design your own presets and store them for future use. Say goodbye to the tedium of repetitive editing and hello to efficiency and consistency.
But what about those unwanted or outdated presets cluttering up your workspace? Simply right-click on the offending preset and select “Delete” to bid it adieu. Keep your workspace fresh and streamlined for maximum productivity.
FAQS
Adding lightroom presets in windows is very simple, you need to refer to our guide, and install presets in lightroom windows step by step, within 2 minutes you learn everything about adding LR presets in the lightroom desktop
Import Lr presets in lightroom mac is similar to the desktop, you should need to follow the second guide, and install presets in lightroom mac step by step. Within 3 minutes, you grab essential knowledge regarding adding Lr presets in lightroom Mac
Conclusion
Editing Lightroom presets on both Windows and Mac desktops is a breeze, with the process being almost identical across both platforms. Should you have any inquiries regarding importing presets on any device, feel free to drop them in the comment section below. I would be delighted to answer your queries promptly and help you navigate this exciting world of photo editing.

Fantastic perspective! I found myself nodding along
Thank you jennyt