Adobe’s AI DeNoise is an innovative tool that employs artificial intelligence to eliminate unwelcome noise from images. This exceptional tool enables you to effectively purify your images and enhance their professional appearance.
As a photographer, you’re always looking for ways to improve your images. One tool that can make a big difference is denoise. But what exactly is denoise, and how does it work? In this article, we’ll take a closer look at denoise in Adobe Camera Raw and demystify this powerful tool.
| 1 | Use the Toolbar | Visit It! |
| 2 | Use Batch Processing option | Use It! |
| 3 | Access Denoise Features At Library Menu | Learn Now! |
| 4 | Access From The navigation Menu | Access Now! |
| 5 | Automatically ADD keyword To Enhance Image option | Click Now! |
What is Denoise?
Denoise is a feature that reduces noise in digital images. Noise is the visual distortion that appears in an image when it’s taken in low light or high ISO situations. It can be especially problematic in areas of the image that should be smooth, like the sky or a solid color background.
The process of denoising involves a thorough examination of the image, allowing for the elimination of noise while preserving the clarity and precision of its features. This technique is especially useful for photographers looking to capture the highest quality imagery, even in the most challenging and unfavorable lighting conditions.
5 Ways To Use Adobe Ai Denoise
We have compiled five techniques that could prove beneficial in utilizing Adobe AI’s denoise feature when attempting to reduce noise in your images. Each of these methods has its own unique advantages and disadvantages, and the optimal choice depends on your personal preference and the specific needs of your project.
1. Use the Toolbar
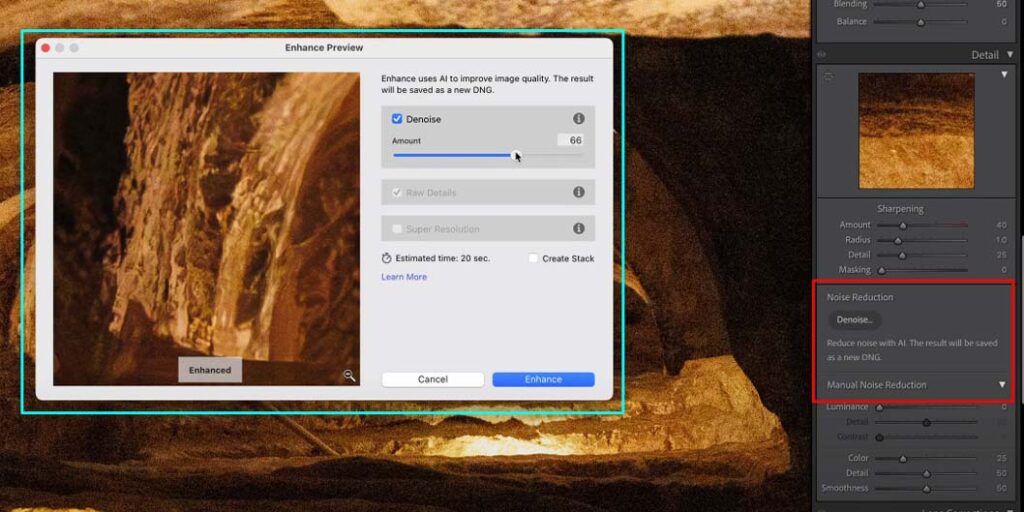
Utilizing the toolbar to access the denoise option is a commonly employed and straightforward method for individuals. To locate this feature, navigate to the “Develop” menu, then see the Detail panel locate where see the denoise option, situated between the “Sharpening” and “Manual Noise Reduction” options.
Upon clicking the denoise option, a pop-up window will appear, allowing you to adjust the slider based on your desired level of noise reduction. Once you have made your adjustments, voila! Your image has been denoised.
2) Use Batch Processing option
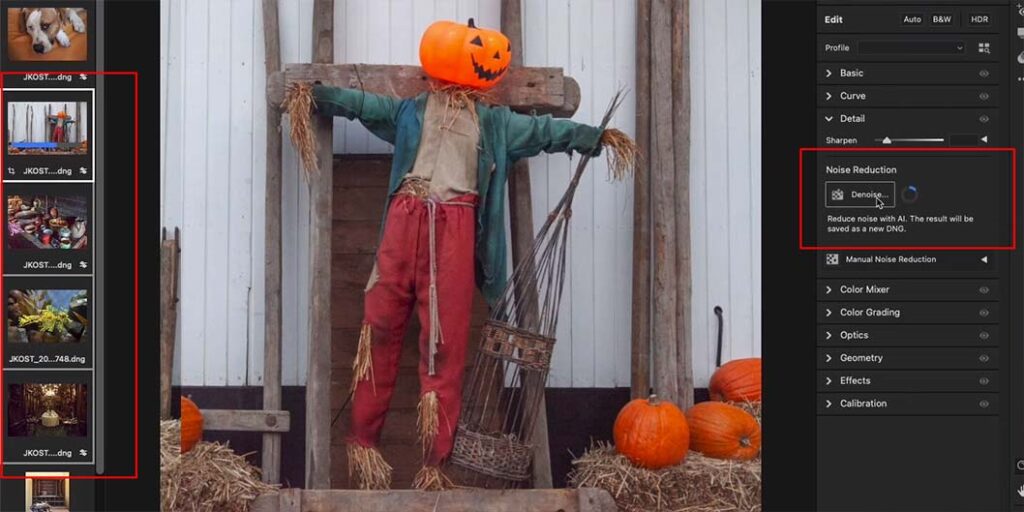
Batch processing provides a rapid means of denoising multiple images with a single click. To accomplish this, begin by selecting the images you wish to denoise, as illustrated in the image. Next, simply click on the denoise option, and within a short amount of time, all of the selected images will be denoised simultaneously.
3) Access Denoise Features At Library Menu
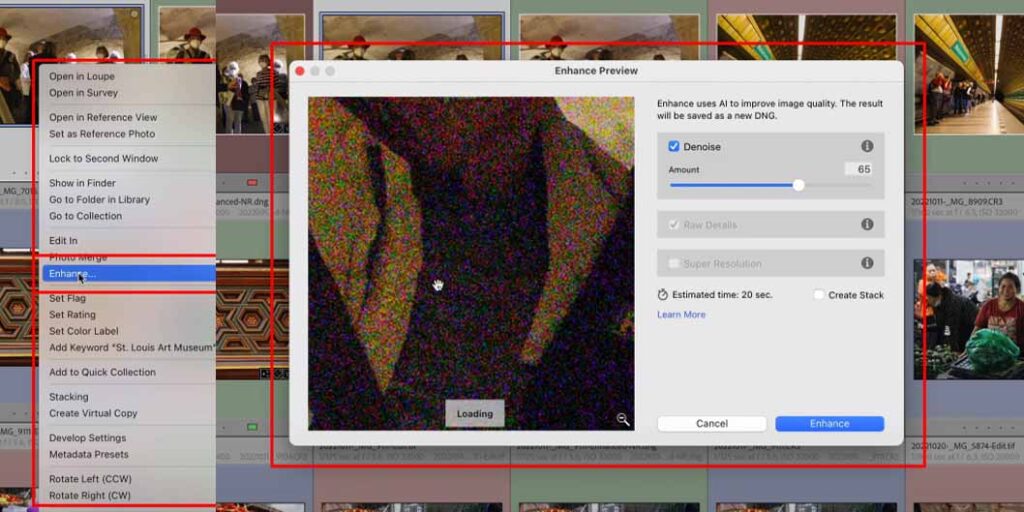
The third technique involves importing your photos and navigating to the library menu. From there, you will need to right-click on the image and select the “Enhance” option. This will reveal the Adobe AI denoise panel, which you can then use to denoise your pictures.
4) Access From The navigation Menu
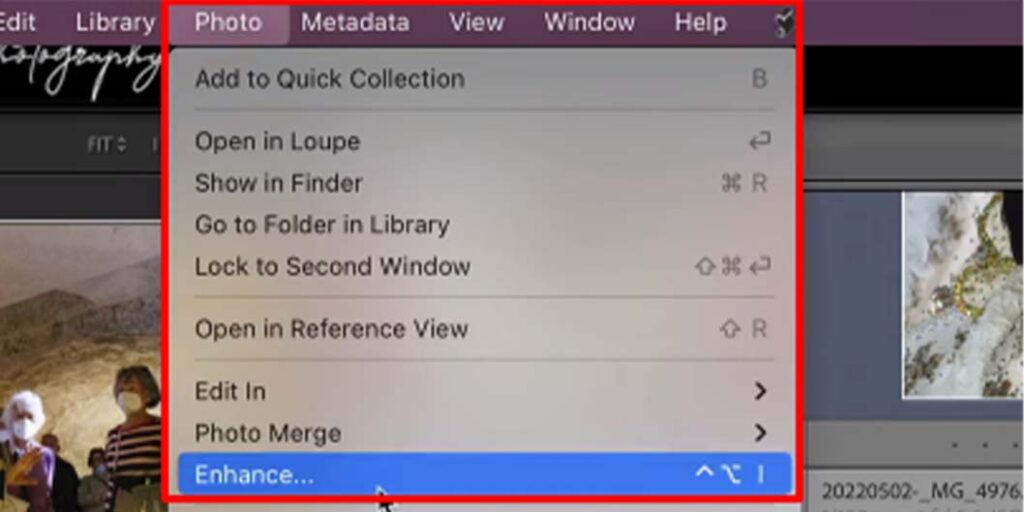
The fourth method is particularly simple, as it only requires you to click on the “Photo” option in the navigation panel. From there, select the “Enhance” option, and you will see the same denoise feature as illustrated in the previous methods.
5) Automatically ADD keyword To Enhance Image option
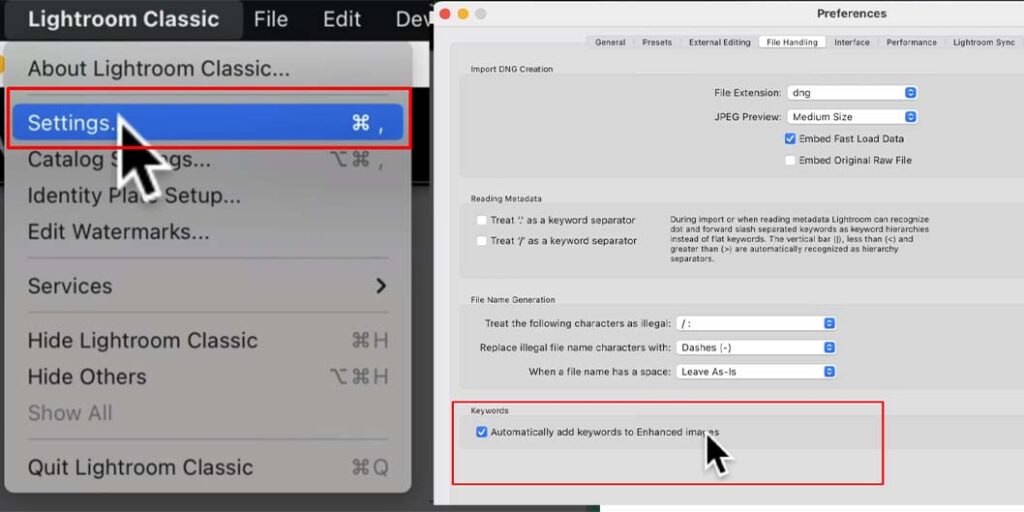
The fifth and final method involves clicking on the “Settings” option, where you will see a “Preferences” popup window. Under this option, select the last option labeled “Automatically add keyword to enhance image” to ensure that this feature works well in the future images as well.
How Does Adobe AI DeNoise Work?
Adobe AI DeNoise uses advanced algorithms to analyze images, separate noise from detail, and apply noise reduction while preserving important details. Its customizable settings allow users to achieve the desired level of noise reduction, making it a valuable tool for photographers and image editors.
| Step | Description |
|---|---|
| Image Analysis | Adobe AI DeNoise begins by analyzing the image to determine the type and amount of noise present. This information is used to determine the appropriate noise reduction settings. |
| Noise Separation | Once the image has been analyzed, Adobe AI DeNoise separates the noise from the detail in the image. This step is crucial because it allows the software to remove the noise while preserving the important details in the image. |
| Noise Reduction | After the noise has been separated from the detail, Adobe AI DeNoise applies noise reduction to the image. The amount of noise reduction applied depends on the level of noise present in the image and the settings chosen by the user. |
| Detail Preservation: | One of the key benefits of Adobe AI DeNoise is its ability to preserve important details in the image while removing the noise. This is achieved through advanced algorithms that identify and protect key elements of the image, such as edges and textures. |
| Customizable Settings | Adobe AI DeNoise also allows for customizable settings to suit the specific needs of the user. These settings include the amount of noise reduction applied, as well as other settings such as color and luminance noise reduction. |
Tips for Using Adobe AI DeNoise
| Use AI mode | Adobe AI DeNoise’s AI mode uses advanced machine learning algorithms to analyze your image and determine the best noise reduction method to use. This can result in more accurate and effective noise reduction. |
| Adjust strength | The strength slider controls the intensity of the noise reduction. Be careful not to overdo it, as this can lead to loss of detail or a “plastic” effect on the image. |
| Use with raw files | Adobe AI DeNoise works best with raw files, as these files contain more information and detail than JPEG files. If possible, shoot in raw format to take full advantage of Adobe AI DeNoise’s capabilities. |
Why Adobe’s AI Features in Lightroom Stand Out
Adobe’s new AI features in Lightroom are a game-changer for photographers. The AI technology used in the denoise feature is particularly impressive, as it allows photographers to take photos in low-light conditions without worrying about image noise. The masking and portrait capabilities are also top-notch, providing photographers with the tools they need to make precise adjustments and enhance their portraits.
Adobe Lightroom Denoise vs Topaz Denoise AI
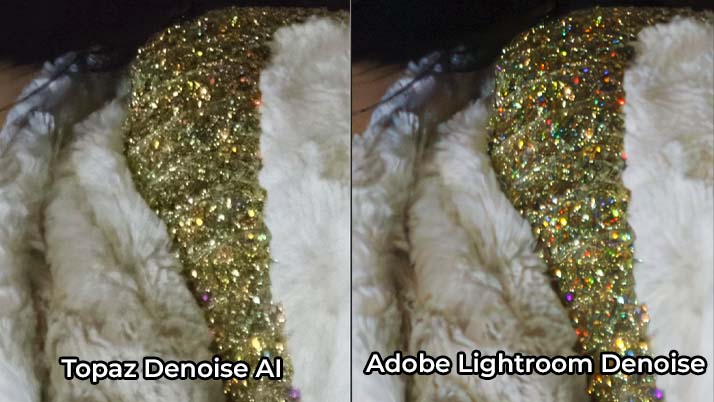
After examining the aforementioned images, it is apparent that the denoise function in Adobe Lightroom AI surpasses that of Topaz AI. However, in normal mode, both appear to have similar results. Based on my assessment, I would opt for Adobe Lightroom. What is your opinion on this matter?
Conclusion
In conclusion, Adobe AI DeNoise is a powerful noise reduction tool that can help you improve the quality of your images. With its advanced machine learning algorithms and customizable settings, you can achieve the desired level of noise reduction while preserving the details and sharpness of your images. If you are looking to enhance the quality of your images, we highly recommend giving Adobe AI DeNoise a try.

